
2021. 5. 25. 12:05ㆍUNITY/공부
1. 미니맵 만들기
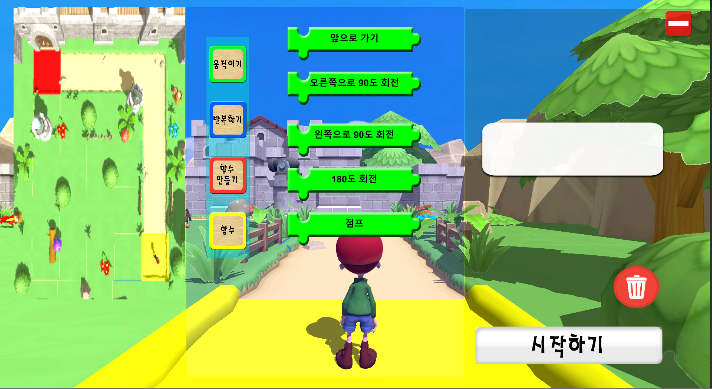
- 미니맵을 만드는 과정


미니맵에 사용할 카메라를 생성하여 각도를 잘 맞춰준다.
프로젝트 - Create - Render Texture 생성

Rawlmage 생성해서 Texture에 아까 만든 Render Texture 넣기

아까 생성했던 카메라에 Target Texture에 Render Texture 넣기

2. 맵 이탈시 쓰러지는 애니메이션
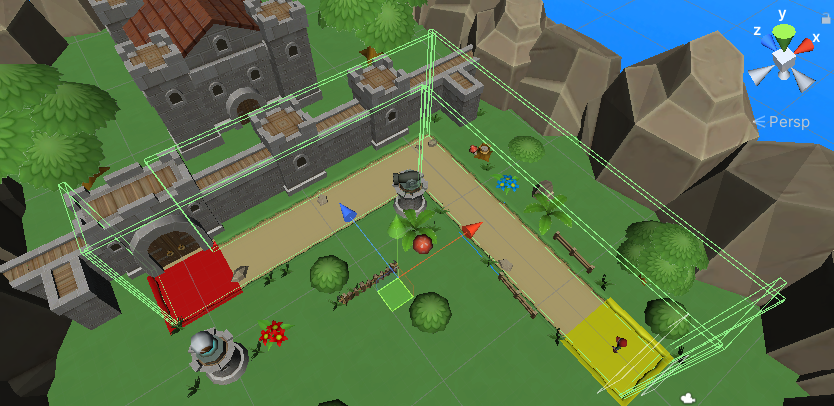
맵 이탈을 막기 위해 맵 주변에 투명벽 (콜라이더) 설치후 태그는 'Wall' 이라고 지정해준다.
void Update()
    {
        if (DeathCheck && animator.GetCurrentAnimatorStateInfo(0).normalizedTime >=0.9f )  //죽는 애니메이션이 끝나면
        {
            transform.position = startPos;
            transform.rotation = StartRot;
            animator.Rebind(); //애니메이션 초기화
            PlayerDeath = false;
            DeathCheck = false;

        }

    }
    public void OnTriggerEnter(Collider other)
    {
        if (other.gameObject.CompareTag("Object") || other.gameObject.CompareTag("Wall")) //장애물이나 벽에 닿으면
        {
            PlayerDeath = true; //true가 되면 앞으로 가는 애니메이션 종료됨
            animator.SetTrigger("Death"); //죽는 애니메이션 실행
            DeathCheck = true; //죽었음
        }

    }
플레이어가 'Object' 혹은 'Wall'에 닿으면 쓰러지는 애니메이션이 실행되도록 한다.
'Object'는 장애물을 뜻하며 현재씬에서는 장애물이 존재하지 않으나 다른 씬에서 추가할 예정이다.
if(FunctionDeath.PlayerDeath == true) // 죽었으면 그만 앞으로 가라
            {
                break;
            }
앞으로 가는 스크립트 'FunctionMove'에 위와 같이 벽에 닿으면 앞으로 가는 동작을 멈추라는 코드를 추가한다.
3. 도착지 인식
    GameObject Player; //플레이어
    GameObject Finish; //도착지점

    private void Start()
    {
        FinishCheck = true;
        Player = GameObject.FindGameObjectWithTag("Player");
        Finish = GameObject.FindGameObjectWithTag("Finish");
    }
    public IEnumerator Go() //스타트W버튼을 눌렀을때 실행되는 코루틴함수
    {
    Fail fail = FailButton.GetComponent<Fail>();
      if (Mathf.Abs(transform.position.x- Finish.transform.position.x) <= 1F && Mathf.Abs(Player.transform.position.z - Finish.transform.position.z) <= 1F) //도착지점에 도착하면
          {
              animator.SetTrigger("Jump");
          }
      else //도착지도 도착하지 못하면
          {
          fail.FailCheck = true;
          }
    }
빨간색 바닥에 Finish 라는 태그를 추가하여 플레이어의 위치와 빨간색 바닥의 위치가 일정이하 일때 빨간색 바닥위에 올라온것으로 인식하고 Jump 애니메이션이 실행된다. 그 외에 위치할 경우 실패했다는 fail 스크립트의 FailCheck가 true가 된다.
using System.Collections;
using System.Collections.Generic;
using UnityEngine;

public class Fail : MonoBehaviour
{
    public GameObject Player;
    Animator animator;
    public bool FailCheck;
    public GameObject FailPanel;
    CanvasGroup canvasGroup;
    Vector3 startPos; //초기위치
    Quaternion StartRot; //초기회전
    // Start is called before the first frame update
    void Start()
    {
        FailCheck = false;
        canvasGroup = FailPanel.GetComponent<CanvasGroup>();
        startPos = Player.transform.position;
        StartRot = Player.transform.rotation;
        animator = Player.GetComponent<Animator>();
    }

    // Update is called once per frame
    void Update()
    {
        if(FailCheck)
        {
            animator.SetTrigger("Death");
            FailCheck = false;
            canvasGroup.alpha = 1;
            canvasGroup.blocksRaycasts = true;
        }
    }

    public void onClickFailButton()
    {
        Player.transform.position = startPos;
        Player.transform.rotation = StartRot;
        animator.Rebind(); //애니메이션 초기화
        FailCheck = false;
        canvasGroup.alpha = 0;
        canvasGroup.blocksRaycasts = false;
    }
}
FailCheck가 True가 되면 실패했다는 패널이 뜬다.
근데 이 스크립트에는 치명적인 오류가 존재한다.

나는 분명 앞으로 2칸이동을 했는데 1칸만 이동했을때 바로 실패를 인식하고 실패창이 뜬다. 내가 몇개의 블록을 넣었는지 인식할 수 있도록 스크립트를 수정해야만 한다.
if (i == (nSize - 1)) //마지막 블록까지 모두 실행됐을때
            {
                if (Mathf.Abs(transform.position.x - Finish.transform.position.x) <= 1F && Mathf.Abs(Player.transform.position.z - Finish.transform.position.z) <= 1F) //도착지점에 도착하면
                {
                    animator.SetTrigger("Jump"); //점프
                }
                else // 도착지점에 도착하지 못하면
                	fail.FailCheck = true; //실패
            }
위와 같이 하여 메인패널의 자식오브젝트 만큼의 블록이 실행된 이후에 점프 혹은 실패가 되도록 한다.
'UNITY > 공부' 카테고리의 다른 글
| [Unity] Input.GetAxis와 Input.GetAxisRaw (0) | 2021.06.22 |
|---|---|
| [Unity] GetButton, GetButtonDown, GetButtonUp (0) | 2021.06.22 |
| [Unity]마우스로 오브젝트 움직이기, Camera.main.ScreenToWorldPoint, Camera.main.WorldToScreenPoint, 유니티 (0) | 2020.06.01 |
| [Unity]카메라가 오브젝트 따라가기, Lateupdate, 카메라이동, 유니티 (0) | 2020.06.01 |
| [Unity]키보드로 조작, 오브젝트 키보드로 움직이기,이동 (0) | 2020.05.31 |